

Visits: 41
Yesterday, I went for a DJI INSPIRE 1 training, organised by ShaShinKi, with two professional pilots from KL, Wan and Tarmizi.
Group selfie from Inspire 1. Amazing resolution!

The training was conducted for one of our customer (Country Garden – China Developer in Malaysia) that purchased the DJI Inspire 1 from Shashinki. It is a company purchase, hence they requested to have some training for the expensive drone.

It took me quite some time to get the trainer, and I am glad that I got two for the same price of one. RM2000 for the course, from around 10am till 3pm.

Some highlights in the training that I want to note:
1. Â Download of latest firmware from DJI website. Prepare the firmware in microSD memory card.
2. Update the firmware of DJI Inspire 1, which includes the bird, the camera and the battery. This can be done by inserting the memory card prepared in step 1 above into the camera of DJI Inspire 1. Power ON the DJI Inspire 1 and the update will get run automatically. During the update, there is di di di di sound (4 tone). It may take up to 20 minutes for the update to be completed. DO NOT POWER OFF THE BIRD DURING THE UPDATE PROCESS. Once completed, the 4 tones changed to 3 tones.

3. UPDATE the controller. Copy the firmware into a USB thumb drive and insert it into the USB port behind the controller. Power ON the controller and the firmware update will start after 5 seconds. Again there will be di di di di tone during update. It took around 10 minutes for the firmware update to be completed. The LED light on the controller will turn green once update is completed, and there is no sound once completed.
If you have more than one battery, no worry. Every time you insert your battery into the bird that has firmware updated, the bird will update the firmware of the battery automatically.

4. Once you have updated all the firmware to the units, now you can connect your controller to the bird. Get an Android phone or Apple iPad or iPhone as the LCD of your controller. This is NOT included in Inspire 1, hence I suggest getting an iPad mini or iPad Air, which has very big and comfortable quality screen. Goto Apple Store or  Google Play to download the DJI Apps. Connect the iPad mini to the controller via USB cable provided by the iPad set. Now power ON the controller by pressing the power button twice and hold.
5. Always power ON the controller first before the Inspire 1 bird. Now the controller should connect to the bird automatically. Your iPad should now see what the Inspire 1 camera sees. If you are using just one controller, you can only control the tilt angle of the camera (up and down). If you want to rotate the camera 360 degree, then you will need a second controller as camera controller. This is the beauty of Inspire 1, where two controllers are allowed (master and slave), with master be the pilot of the bird, and slave be the camera controller of the Inspire 1.
(if you can’t connect your controller to the bird, Google for solution. There is a rest button hidden beneath the Inspire one, dark red tiny button, very difficult to find.)
- Calibrate the IMU of your bird. Choose the calibration from the menu of the DJI Apps in the iPad. Cueing calibration, make sure that the bird is placed on a concrete surface with no shake or disturbance.
- Set the Gimbal speed of your bird to 50% of the original 100% default setting. This will make the movement (rotate or tilt) smoother and easier to control.
- Set the return home altitude to 60m or 100m. Default is 20m, which might be too low and hit surrounding obstacles when returning home in auto mode.
6. Now with with everything ready, you can start fixing the propellers to the bird. Make sure they are locked securely. One set of propellers can last you around 200 flights.
7. For a start, go to an open area with no obstacles to test flight your Inspire 1. Do not use auto take off, manual is safer. Pull two sticks down inward (V shape) to start your bird.
8. Calibrate the compass. Make sure that you are free from metal disturbance from the surrounding. In our test, we put the bird on top of a metal plate and the controller showed Compass error. We have to move our bird to the sand part to take off. To calibrate the compass, first hold your bird with nose pointing outward. Rotate yourself anti-clockwise 360 degree. Then hold the bird with nose pointing downward, turn 360 degree anti-clockwise again.

9. Start your first flight. Lift off slowly till around 1 meter from the ground. You will see the legs start going up. Now you can go higher and start your flight. Flight time according to DJI is around 25 mins, but it is quite impossible or risky to go such length. I suggest 15 mins for 4700mah battery and 18 mins for 5400mah battery.

10. When landing, control your Inspire 1 to height around 1m. The legs will automatically lower down to landing mode. Now you are safe to land. DO NOT land in rush before the legs lower down, as your camera will hit the ground and get damaged.

11. Some useful info
Turn the home level 4 times to up or down the legs. After removing the camera, you can lower the legs to transport mode. You can only store the Inspire 1 in transport mode in the original DJI casing.
Press return to home button (next to the power button) when your Inspire 1 is very far away.

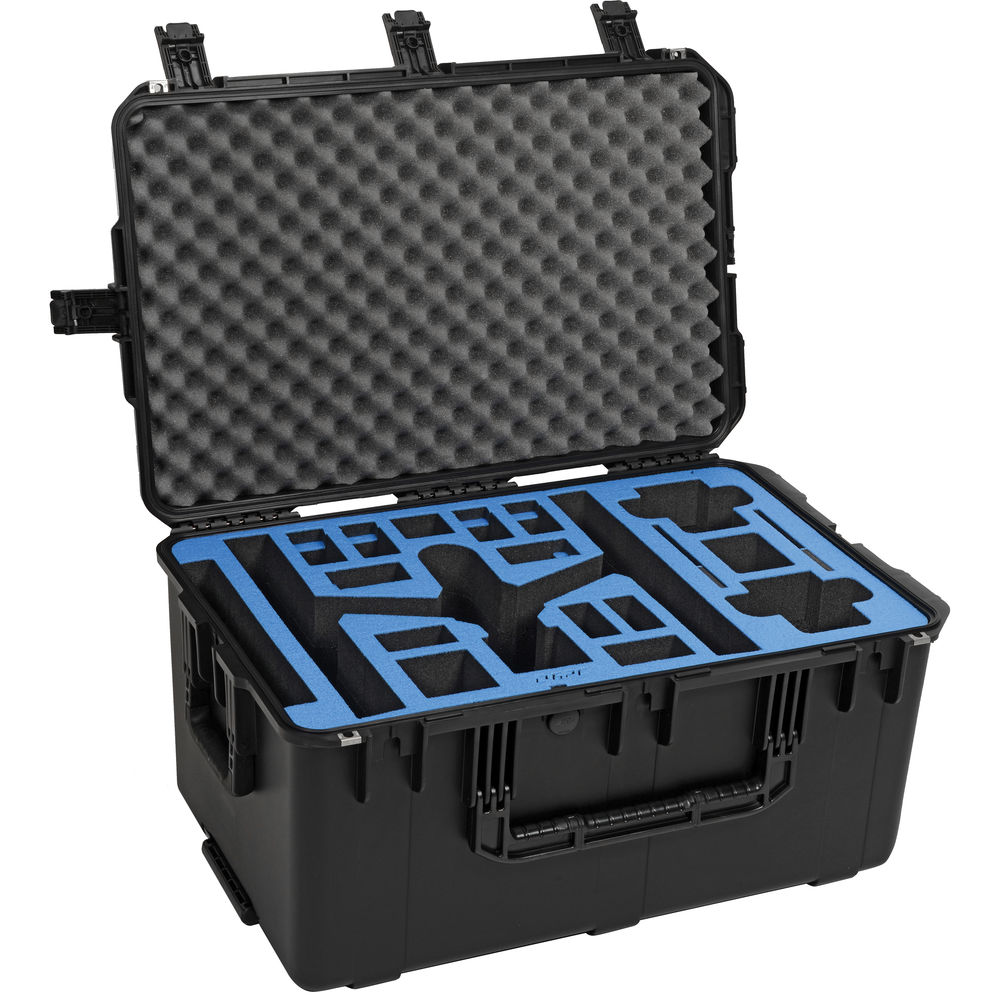
You can store TWO controllers and 4 batteries in the original DJI Inspire 1 case. You can also put TWO iPad mini in the case by removing the instruction manual box at the bottom.

Suggest replacing the DJI Inspire 1 case with a hard type casing with roller. Go Professional Cases DJI Inspire 1 Landing Mode Case.

12. Always use controller and iPad LCD to control your Inspire 1. Do not rely on actual eye visual or contact of your Inspire 1. When your Inspire 1 is in the air, you on the ground is hard to estimate the distance of your bird. There are lots of information available on the iPad screen to make your flight safe. Get a LCD hood for the iPad, else it will be very difficult to view under the sun.
13. Video and photo can only be use one at a time. Fly slowly and you shall see very smooth video or very sharp photos even under windy condition. The controller allow changing of exposure on the camera even during the flight. Use the provided ND filter for day flight, and UV Filter for night flight. Try which one you prefer.


More Stories
Happy Chinese New Year 2023 from ShaShinKi
ShaShinKi Family Dinner on 29th Oct 2022
ShaShinKi.com web design look back